

|
|
LT89 Project starts........about time too |
Post Reply 
|
Page 123 4> |
| Author | |
LTCamper89 
Vanorak 
Joined: 18 Apr 12 Location: The Toon Status: Offline Points: 4285 |
 Post Options Post Options
") Thanks(0) Thanks(0)
 Quote Reply Quote Reply
 Topic: LT89 Project starts........about time too Topic: LT89 Project starts........about time tooPosted: 20 Jun 14 at 21:34 |
|
So after humming and haa-ing(?), and collecting numerous bits with the intention, and we all know where they lead, of sorting it properly, I have started.
 I picked up some bathroom bits, shower tray, basin, shower, taps etc for £16 and a Cascade 2 for £20 last week, so there was even more loose stuff in the van that needed a permanent home. Unfortunately I had more MIL duties today so did not turn a tool until 2.00pm. I had already pulled the ceiling panel down.    The ancient fibreglass insulation is minging, and wearing a mask means I can only see what I am doing while demisted. The next thing was the remnants of the dog cage stuff from the previous owners. I had taken almost all of it out, almost immediately. Still got it all, and not really sure what to do with it. The original door restraints had been removed and replaced with some fabricated ones, which are a bit ugly and also seem to have been wrenched at some point judging by the dint in the left rear door. Grinder out and tally-ho chaps.  Edit:  Then came the removal of the two days hard work done for last years' CamperJam. Cooking facilities, sink, gas bottle storage just ahead of the wheelarch in the picture above, came out without any trouble. Then the lower paneling, a type of hardboard possibly fire rated. Some rivets to drill out and a good heave saw that lot out easily. Naturally, the evil fibreglass was packed in there too. Starting at the left corner by the door and working forward, packing the insulation into black bags for disposal.   The red oxide painted horizontal ribs are mounts for the twin buddy seats, which were also removed earlier. Grief the frame was heavy. Another thing I am not sure what to do with.  You can see four welds on the centre of the picture, just to the left of the central vertical frame and above the chine. Since the spray glue, or whatever the red spiderweb is, does not cover them I guess they were something that happened in the ownership of the dog people.  I had noticed some dampness when removing the insulation ahead of the wheelarch, and obviously the reason is not hard to discover. I had given the underside a good jetwash so when I did actually start cutting the undercarriage, at least it would be clean crap. Not as much ended up on the drive as I had expected though.  The battery carrier was the next thing to come out. I had bought a welder, no experience at all prior, since I knew I was going to need it. I did a little patch, my first ever, for the first MOT test, above the nearside wheelarch, yes, I know I should have painted it, but this stand was a proper job. I used some IKEA scrap 20x10 18g box section. MMA welded since I did not want to waste my gas by trying to get it right, getting it right and then not having enough to finish it. I had gone to my local BOC store to get a big bottle but they knew nothing about the scheme. I still have not been back to Katie but will be on Monday. Anderson,Katie <Katie.Anderson@boc.com> 09/05/2013 Hi Chris, Thanks for your email. Give me a call if you can, direct line 0161 930 6234 The Volkszone offer is still available but not all of the stores / agents are aware of it unfortunately. Kind Regards Katie Anderson. Business Development Advisor. Direct Sales. BOC Tel: 0161 930 6234 Fax: 0800 587 5767 E-mail: katie.anderson@boc.com The Eberspacher is hiding below it, for now, and the crap relay is being replaced by a PMS3.   Shower tray trial fit was then assessed. Pictures and words tomorrow, but it is a bit longer than I thought, 1100mm. It has a wheelarch hump but 'in the wrong place'. A plan is afoot, so Hakuna matata. I will have to blank the rear nearside window, big welding job that one. Next thing out is the nearside windows so I can get the fibreglass moulding off and the insulation behind it in the bin. The remaining evil glass strands need to be addressed. There are little bits hanging around on the roof. My first thought was to vacuum them off. This however may just break them up into smaller bits, some of which may get out through the filter and into the outside world. Even then I would still need to clean out the vacuum cleaner. Thought number two was to spray paint them into submission. A rattle can would not have sufficient pressure to dislodge them en masse, and if they did break free, they would be coated with paint anyway and so would stick to whatever they fell onto. Your thoughts, always appreciated. Underway. woo bloody hoo. Edited by LTCamper89 - 23 Jun 14 at 20:28 |
|
|
1989 LT28 2.4D Saviour of 6Music, well one of them. Now playing http://www.bbc.co.uk/radio/player/bbc_6music
VW LT Camper not Cramper ....at least the roof is not rusting away.... |
|
 |
|
|
LTCamper89
Vanorak
Joined: 18 Apr 12 Location: The Toon Status: Offline Points: 4285 |
Post Options
Thanks(0)
Quote Reply
Posted: 20 Jun 14 at 21:53 |
|
....and I got my steel today, including some to make this from TonyBMWs' thread on RetroRides.
 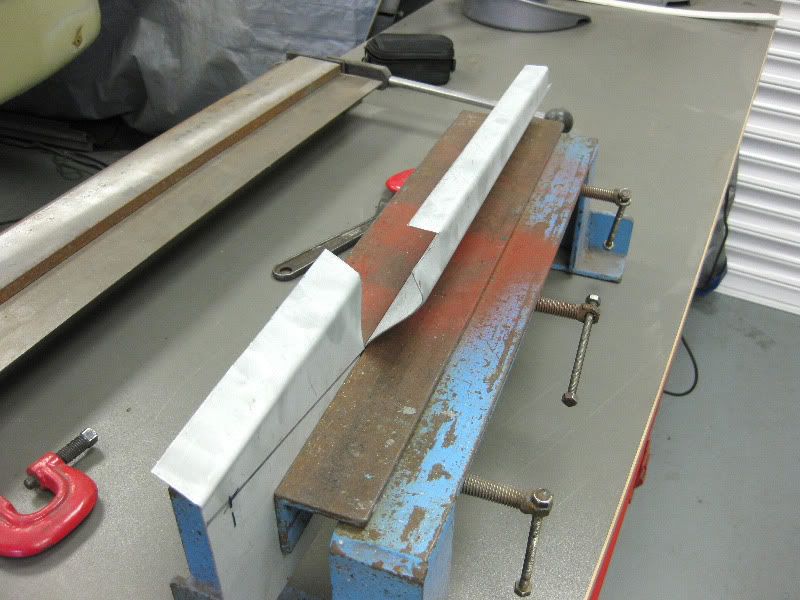 A proper How To Make Stuff in Metal.
|
|
|
1989 LT28 2.4D Saviour of 6Music, well one of them. Now playing http://www.bbc.co.uk/radio/player/bbc_6music
VW LT Camper not Cramper ....at least the roof is not rusting away.... |
|
|
|
|
LTCamper89
Vanorak
Joined: 18 Apr 12 Location: The Toon Status: Offline Points: 4285 |
Post Options
Thanks(0)
Quote Reply
Posted: 21 Jun 14 at 20:11 |
|
Somewhere after 2.00pm today the camera was hit by something, which means I cannot get the card out or a cable in, so no pictorial update.
The basics are that offisde rear door restraint is off, as are the lower hardboard panels, and thus the insulation behind them is in the bin. Both upper fibreglass panels, and their windows, were removed and the insulation went into the bin too. The windows had the icky coloured film removed, so they are now clear. We have decided to keep the upper panels since the remedial work involved in making them good, is relatively small, a bit of hole filling and a respray. Although I had originally considered spray-on foam insulation, I instead plumped for the multi-layer aluminium foil blankets. They are thin enough when compressed to be fastened tightly behind the upper panels. They are a bit baggy everywhere else. The upper panels went back on over the shiny space blankets, and the windows went back in relatively easily but unfortunately not without casualties. We already had some cracks in the panes, but managed to make them worse, not difficult at all, and I made some new ones of my own. The nearside rear window is going to be plated in anyway for the bathroom. When the windows go in easily it is near impossible to replicate the method on the next one, so with six, a proper pain. Time for tea, so I put everything back into the van, obscured the windows and then discovered the malfunctioning camera. Oh well, a bottle of Shiraz awaits, and tomorrow the floor comes out.
|
|
|
1989 LT28 2.4D Saviour of 6Music, well one of them. Now playing http://www.bbc.co.uk/radio/player/bbc_6music
VW LT Camper not Cramper ....at least the roof is not rusting away.... |
|
|
|
|
LTCamper89
Vanorak
Joined: 18 Apr 12 Location: The Toon Status: Offline Points: 4285 |
Post Options
Thanks(0)
Quote Reply
Posted: 22 Jun 14 at 20:39 |
|
The floor is out along with the rails which will have been used for securing the gurneys and wheelchairs. They may be of some use to someone so I will do a drawing tomorrow. Dearly Beloved remembered that her Hudl can take photographs, so we did some late on but I cannot be bothered tonight to find out where they are in it.
The rails were bolted in, one line easily accessible, but the matching set were right up against the chassis rail so Dremel out, and ten discs later all were out. Of course, working underneath with sparks and hot nuts cascading down on me was no fun at all. Since the were no spreaders used the floor is distorted a little around each fixing hole so some hammer type persuasion was required. Edit: 4no 832mm long Unwin rails.  Dearly Beloved was flap-discing the holes whilst I was digging the seam sealer from the longitudinal central joint and the fuel filler cover, both of which had succumbed to rust. Edit:  Edit:  There are some areas which will need patching, both sides ahead of the rear wheelarches, are the main ones. This area seems to make regular appearances in this type of thread. It must be a particular weakness in the sealing process. Basically though they are hand-sized so I suppose I am very lucky. I know I will be cutting away more than a hand-sized piece, but in the greater scheme of things, small. I have some holes from previous appliances to fill too, but again two thirty diameter holes and a few other little ones, is not a lot. Edit:   ?Is there a plate over the outermost chassis rail and then the floor? It looks like it but then again the steel there was heading on for 10mm thick due to rust. There is a lot of thickening due to rust and so some cutting out to do. Still getting my head around the way the van is constructed so I do not cut the wrong bit at the wrong time. Welding holes tomorrow, so a little question. There is no way I am grinding all the undersides, so I was going to put some etch primer on to seal them from the outside world for the present. ?Better to do something else? A bit duff without pictures, but I am out and about on Tuesday so will replace the camera then. It looks like I will need to be making a bender soon too.
Edited by LTCamper89 - 23 Jun 14 at 20:15 |
|
|
1989 LT28 2.4D Saviour of 6Music, well one of them. Now playing http://www.bbc.co.uk/radio/player/bbc_6music
VW LT Camper not Cramper ....at least the roof is not rusting away.... |
|
|
|
|
timaldiss
Yardie 

Joined: 15 Jan 14 Status: Offline Points: 255 |
Post Options
Thanks(0)
Quote Reply
Posted: 22 Jun 14 at 21:25 |
|
Nice update Chris, and it sounds like you've made a good start. Welding is one thing I've never tried but would love to and believe it or not I envy the project you've taken on! I just wish I had more space to do it in down here. Just keep your eye on the end goal - feet up with a nice ale in a field of your choice somewhere down a winding road after a nice drive :) Nothing better!
PS Not sure if I've seen a photo of the outside of your LT... can you post one? |
|
|
-------
I have a history of VW LT camper van addiction: http://campervanman.co.uk |
|
|
|
|
LTCamper89
Vanorak
Joined: 18 Apr 12 Location: The Toon Status: Offline Points: 4285 |
Post Options
Thanks(0)
Quote Reply
Posted: 22 Jun 14 at 21:43 |

Good grief that is massive. It does not have the banner on the roof, it does have VW hubcaps, the numberplate is in a Brickwerks holder under the nearside headlight and the aerial is now a DAB stubby. There is less paint due to over enthusiastic jet-washing. No bullbar at the moment, Dearly Beloved wants it back on, but I am not so sure. For the horticultural, the fennel has gone too. You are looking at my workspace, on the street. Come on them numbers.  I am halfway there Tim, 2no Broadside down and an Old Tom on the way. Now I have started I am actually not wanting to stop. EEK
Edited by LTCamper89 - 22 Jun 14 at 21:44 |
|
|
1989 LT28 2.4D Saviour of 6Music, well one of them. Now playing http://www.bbc.co.uk/radio/player/bbc_6music
VW LT Camper not Cramper ....at least the roof is not rusting away.... |
|
|
|
|
LTCamper89
Vanorak
Joined: 18 Apr 12 Location: The Toon Status: Offline Points: 4285 |
Post Options
Thanks(0)
Quote Reply
Posted: 23 Jun 14 at 20:25 |
|
Welding holes...no better way to spend a few hours. I am officially crap at that though. No pictures
 However, I did get better even with the spitting and crackling due to the crud on the underside. I had started with sticks but got sick of not being able to hold the arc with the base material so, damn the expense, I got the bottle out and spent a while trying to figure out why I could not get any gas through the peashooter. However, I did get better even with the spitting and crackling due to the crud on the underside. I had started with sticks but got sick of not being able to hold the arc with the base material so, damn the expense, I got the bottle out and spent a while trying to figure out why I could not get any gas through the peashooter. Switching the machine over to MIG helps a hell of a lot Switching the machine over to MIG helps a hell of a lotOnce that was done the sound, if not the smell, of sizzling bacon met my shell-likes. Still not easy welding holes. and I have a good bit of grinding to face after I do the other 5 square metres. Quite enjoyed that though making the van and gear pikey-proof at the end of each shift is truly tiresome.
|
|
|
1989 LT28 2.4D Saviour of 6Music, well one of them. Now playing http://www.bbc.co.uk/radio/player/bbc_6music
VW LT Camper not Cramper ....at least the roof is not rusting away.... |
|
|
|
|
mat_the_cat
Vanorak
Joined: 06 May 09 Location: North Wales Status: Offline Points: 1862 |
Post Options
Thanks(0)
Quote Reply
Posted: 24 Jun 14 at 10:26 |
|
I passionately hate working upside down welding under cars! Personally I'd try and do as much as you can from above, although you will have to butt weld rather than overlap to avoid a water trap seam. I managed to do all mine from above - where it came to joining to the chassis rails I butt welded to the outer edge of them, then closed off the open section from above. Then wax injected inside the rails to try and get it between the layers I'd created.
That was 2007; crikey, how time flies! But still solid after nearly 50k miles  |
|
|
Mid engined, 6 cylinder, turbocharged 2 seater - it can only be a VW LT!
|
|
|
|
|
LTCamper89
Vanorak
Joined: 18 Apr 12 Location: The Toon Status: Offline Points: 4285 |
Post Options
Thanks(0)
Quote Reply
Posted: 24 Jun 14 at 16:34 |
|
Quiet day today, mainly because when scuttling around with a grinder under the van the day before yesterday, it appears I nicked the flexible hose to the brake regulator. typical. Replaced it this afternoon and bled them the old fashioned way with Dearly Beloveds' foot at the helm. Seems good. Trip to the tip tomorrow will test them out and get me a new camera, not from the tip.
I had a look at the 'welding' from underneath too, and some are rather nice from down there. I suppose I can only get better. More practice tomorrow at welding thin air/metal.
|
|
|
1989 LT28 2.4D Saviour of 6Music, well one of them. Now playing http://www.bbc.co.uk/radio/player/bbc_6music
VW LT Camper not Cramper ....at least the roof is not rusting away.... |
|
|
|
|
Canada LT28
Vanorak

Joined: 03 Jan 10 Location: Toronto Status: Offline Points: 1632 |
Post Options
Thanks(0)
Quote Reply
Posted: 25 Jun 14 at 11:33 |
ohoh, LT, do you have a pic or link to the insulation? If it is what I think it is, it is as useless as tits on a bull. Discredited all to hell. Stick with a mineral wool. |
|
|
94 LT28 Doka 2.4D
Slow and built to stay that way 87 T3 soon to be a camper |
|
|
|
|
LTCamper89
Vanorak
Joined: 18 Apr 12 Location: The Toon Status: Offline Points: 4285 |
Post Options
Thanks(0)
Quote Reply
Posted: 25 Jun 14 at 12:17 |
 Now you tell me. I used it for our utility room which was single brick, and was very impressed with the change over the winter. I would have liked to use sheeps' wool but too many pennies required.
Edited by LTCamper89 - 25 Jun 14 at 12:17 |
|
|
1989 LT28 2.4D Saviour of 6Music, well one of them. Now playing http://www.bbc.co.uk/radio/player/bbc_6music
VW LT Camper not Cramper ....at least the roof is not rusting away.... |
|
|
|
|
LTCamper89
Vanorak
Joined: 18 Apr 12 Location: The Toon Status: Offline Points: 4285 |
Post Options
Thanks(0)
Quote Reply
Posted: 26 Jun 14 at 21:58 |
|
Welded more holes today and then ran out of gas, so onto the phone to Nicola Smith 0161 9306014 at BOC HQ to get the low down on opening an account within the VolksZone offer.
Prices I was quoted today are: Y Bottle Argoshield Light Refill £26.50+VAT Rental £38.70+VAT Y Bottle Argoshield Refill £36.30+VAT Universal Rental £38.70+VAT The environment and energy surcharge was £0.00 If you do not sign up for direct debit of the annual rental there is a £2.00+VAT invoice fee, once per year. Even though Nicola had phoned the branch after I had spoken to her in the morning it still took an absolute age to open the account but got there in the end. Back home after collecting the new camera, and Dearly Beloved from school, had some tea and then put in another couple of hours and did this little bit of patching.  To the left are two holes which I think are from a heater which was connected to the vans' radiator. The pipe is visible below. ?Anyone got any information? I was thinking about removing the pipe which loops past the holes and returns to the radiator. The larger hole to the right is one of mine, cut for the Eberspacher. The panel was kept nad since it is far too small to be reused, it got cut down.  ....and welded....  OK job. I think the brown staining is from the underseal etc below. The gauge, and peashooter are showing about 7lpm.  I used a grinding disc for the majority of the cleaning up and then a 40 flapdisc for the final smoothing. I did not spend enough time lining up the patch since there was a step on the right hand high section, but not too bad for a second go. Only a half day tomorrow, but I have a lot of welds to grind into submission.
|
|
|
1989 LT28 2.4D Saviour of 6Music, well one of them. Now playing http://www.bbc.co.uk/radio/player/bbc_6music
VW LT Camper not Cramper ....at least the roof is not rusting away.... |
|
|
|
|
timaldiss
Yardie
Joined: 15 Jan 14 Status: Offline Points: 255 |
Post Options
Thanks(0)
Quote Reply
Posted: 26 Jun 14 at 23:00 |
|
Bloody hell, good job Chris
|
|
|
-------
I have a history of VW LT camper van addiction: http://campervanman.co.uk |
|
|
|
|
LTCamper89
Vanorak
Joined: 18 Apr 12 Location: The Toon Status: Offline Points: 4285 |
Post Options
Thanks(0)
Quote Reply
Posted: 27 Jun 14 at 07:55 |
|
You should see some of the earlier 'welds'
 They will be getting fettled today. They will be getting fettled today.
|
|
|
1989 LT28 2.4D Saviour of 6Music, well one of them. Now playing http://www.bbc.co.uk/radio/player/bbc_6music
VW LT Camper not Cramper ....at least the roof is not rusting away.... |
|
|
|
|
LTCamper89
Vanorak
Joined: 18 Apr 12 Location: The Toon Status: Offline Points: 4285 |
Post Options
Thanks(0)
Quote Reply
Posted: 27 Jun 14 at 13:19 |
|
Well that is me done for today. I have cleaned up, and reworked, half the vans' smaller holes now, just leaving the Eber hole and the two big patches ahead of the wheelarches to attack.
I changed the method of cleaning up, to a 24grit sanding disc instead of the grinding disc. It does heat things up a bit more, but is much quieter, considering my surroundings, and did not bounce around at all. Some of the first welds had no penetration and 'fell off', but practise will make nearly perfect. I had fiddled about with the settings yesterday so I am bound to find others. I think that using the flapdisc to clean off the surrounding area was a mistake, twisted wire brush is the way to go, much less aggressive thus leaving more metal substrate. Off to Stockton on Sunday to see the LT Fire Engine, and I have just noticed, vertical indicator repeaters.  |
|
|
1989 LT28 2.4D Saviour of 6Music, well one of them. Now playing http://www.bbc.co.uk/radio/player/bbc_6music
VW LT Camper not Cramper ....at least the roof is not rusting away.... |
|
|
|
|
Canada LT28
Vanorak
Joined: 03 Jan 10 Location: Toronto Status: Offline Points: 1632 |
Post Options
Thanks(0)
Quote Reply
Posted: 27 Jun 14 at 23:25 |
Well, it is NOT what I though it was (mylar backed bubble wrap) which is total BS. This looks alright. Just so you know, any reflective foil needs to have an air space in front of it to be a radiant barrier so if it is pushed into a cavity and compressed at all, you would be better off with mineral wool (which is more water resistant too). Nice welding Chris, I better practice more.  Edited by Canada LT28 - 27 Jun 14 at 23:27 |
|
|
94 LT28 Doka 2.4D
Slow and built to stay that way 87 T3 soon to be a camper |
|
|
|
|
LTCamper89
Vanorak
Joined: 18 Apr 12 Location: The Toon Status: Offline Points: 4285 |
Post Options
Thanks(0)
Quote Reply
Posted: 28 Jun 14 at 08:02 |
|
I need to practise more too since when I flattened the area a bit more, I made some more holes.
 The insulation is not 'packed in', where it does not touch the ribs it is within a three inch void. The vans' metal ribs are not really close enough together but I could stick timber ones between them to help out.
Today the offside side of the van will get flattened off, and probably rewelded too in places, but I have had a thought about cleaning the underside. The twisted wire wheel will be good for most of the more open areas, but I know there are a couple within the narrow crossmembers. A 4 1/2" grinding disc could not get in to get the Unwin rails out. ?Any ideas gents?....or ladies |
|
|
1989 LT28 2.4D Saviour of 6Music, well one of them. Now playing http://www.bbc.co.uk/radio/player/bbc_6music
VW LT Camper not Cramper ....at least the roof is not rusting away.... |
|
|
|
|
LTCamper89
Vanorak
Joined: 18 Apr 12 Location: The Toon Status: Offline Points: 4285 |
Post Options
Thanks(0)
Quote Reply
Posted: 28 Jun 14 at 20:47 |
|
More mess made. A bit of fettling and a little more welding and then some digging.
 Lots of 6-8dia holes filled and scuffed down. The above shot is forward of the nearside rear wheelarch. The digging entailed getting to the bottom of the area behind the cab. The rooflight had been leaking for, probably, a number of years before we got the van, so the carpet and plywood under it was wet every time it rained.  Basically not bad at all, except the corner behind the driver. Chisels to take out the seam sealer which was 3-4mm thick in places, and then twisted wire brush to clean up the slight rusting before Vactanning the beJesus out of it. Being new to this 'restoration' stuff, the right hand corner is concerning me since too many corners are meeting at once.  I turned my attention to the offside wheelarch area, even though I had said to myself I was going to leave it for another day.  Marked out and cut. There is a lot of distortion along the closest chassis rail past the wheelarch towards the back doors, top right corner of the above shot. I do not think that the floor skin is rusting but the capping panel on the chassis rail. The cap appears to be spot-welded on, so they were drilled out. Very awkward getting into the side of the wheelarch, so that will be fun. ?Do I remove the whole of the section towards the doors? A rhetorical question, since I really do not want to, but equally I really, really do not want to have the vans' floor bulging when I am fitting the floor timbers.  Naturally, when I started to check whether the panel would move I found a wire I had missed in my rummaging underneath. I think it is a redirected wire for the fuel tank. Cut in half by a disc and stripped and soldered and rerouted.  I will clean up tomorrow morning since I am off to Stockton for a date with a red hot red LT. Quite enjoying this now I have started, you were right Mike. |
|
|
1989 LT28 2.4D Saviour of 6Music, well one of them. Now playing http://www.bbc.co.uk/radio/player/bbc_6music
VW LT Camper not Cramper ....at least the roof is not rusting away.... |
|
|
|
|
lorryloader
Yardie

Joined: 27 Sep 12 Location: ireland Status: Offline Points: 857 |
Post Options
Thanks(0)
Quote Reply
Posted: 30 Jun 14 at 12:52 |
|
Another brave man good luck.
|
|
|
LT-45 HIGH TOP + LT-55-BEVERTAIL.Mercedes Atego tilt n slide with lorry loader crane.
|
|
|
|
|
roundandsquare
Groupie 

Joined: 21 Feb 09 Location: Edinburgh Status: Offline Points: 48 |
Post Options
Thanks(0)
Quote Reply
Posted: 30 Jun 14 at 21:08 |
|
"Quite enjoying this"??????
You must be as twisted as I am. Looks Like we're simultaneously enjoying the fun of LT rust surgery. Good work though. I'm sure it'll be worth it. Keep it up..... good show....... don't give up....... nearly there....... The next bit can't be as bad.........
 |
|
|
LT35 2.4 diesel (not turbo) hybrid van/camper type thing...
|
|
|
|
|
Post Reply
|
Page 123 4> |
| Tweet |
| Forum Jump | Forum Permissions You cannot post new topics in this forum You cannot reply to topics in this forum You cannot delete your posts in this forum You cannot edit your posts in this forum You cannot create polls in this forum You cannot vote in polls in this forum |


 Topic Options
 LTCamper89 wrote: